install.packages("tmap")
install.packages("maptiles")
install.packages("tidyverse")
install.packages("gt")
install.packages("sf")
install.packages("spdep")
install.packages("sfdep")
install.packages("terra")
install.packages("e1071")
install.packages("car")
install.packages("spatstat")6 Software and File Management
6.1 Downloading and Installing R and RStudio
To use R and RStudio, you will need to download and install both programs on your computer.
Download R (make sure to download the correct version for your operating system)
Once you have downloaded and installed RStudio, open up the application. We need to change one global setting before we start. You only need to do this once! Navigate Tools > Global Options, unclick “Restore .RData into Workspace at Startup” and choosing Never on the “Save workspace to .RData on exit”.
6.2 Using .Rmd files
To create a .Rmd file go to File > New File > R Markdown.
A .Rmd is made up of two main components: code chunks (this is where you write code) and text (any words that are outside of a code chunk). Any time you are writing code, it needs to be in a code chunk. Chunks can then be run to execute the code within the chunk. The idea of chunking is to group code that accomplishes a single, related task into one code chunk. When you begin a new step or process in your workflow, you start a new chunk.
Knitting a .Rmd means that you create a rendered .html including your code, output, and text. To knit your document, click the knit button. It will create a .html in whatever folder you have the .Rmd saved in.
This file introduces R Markdowns
This file provides an example of how to use R Markdowns in an Analytical Workflow
6.3 The RStudio Environment
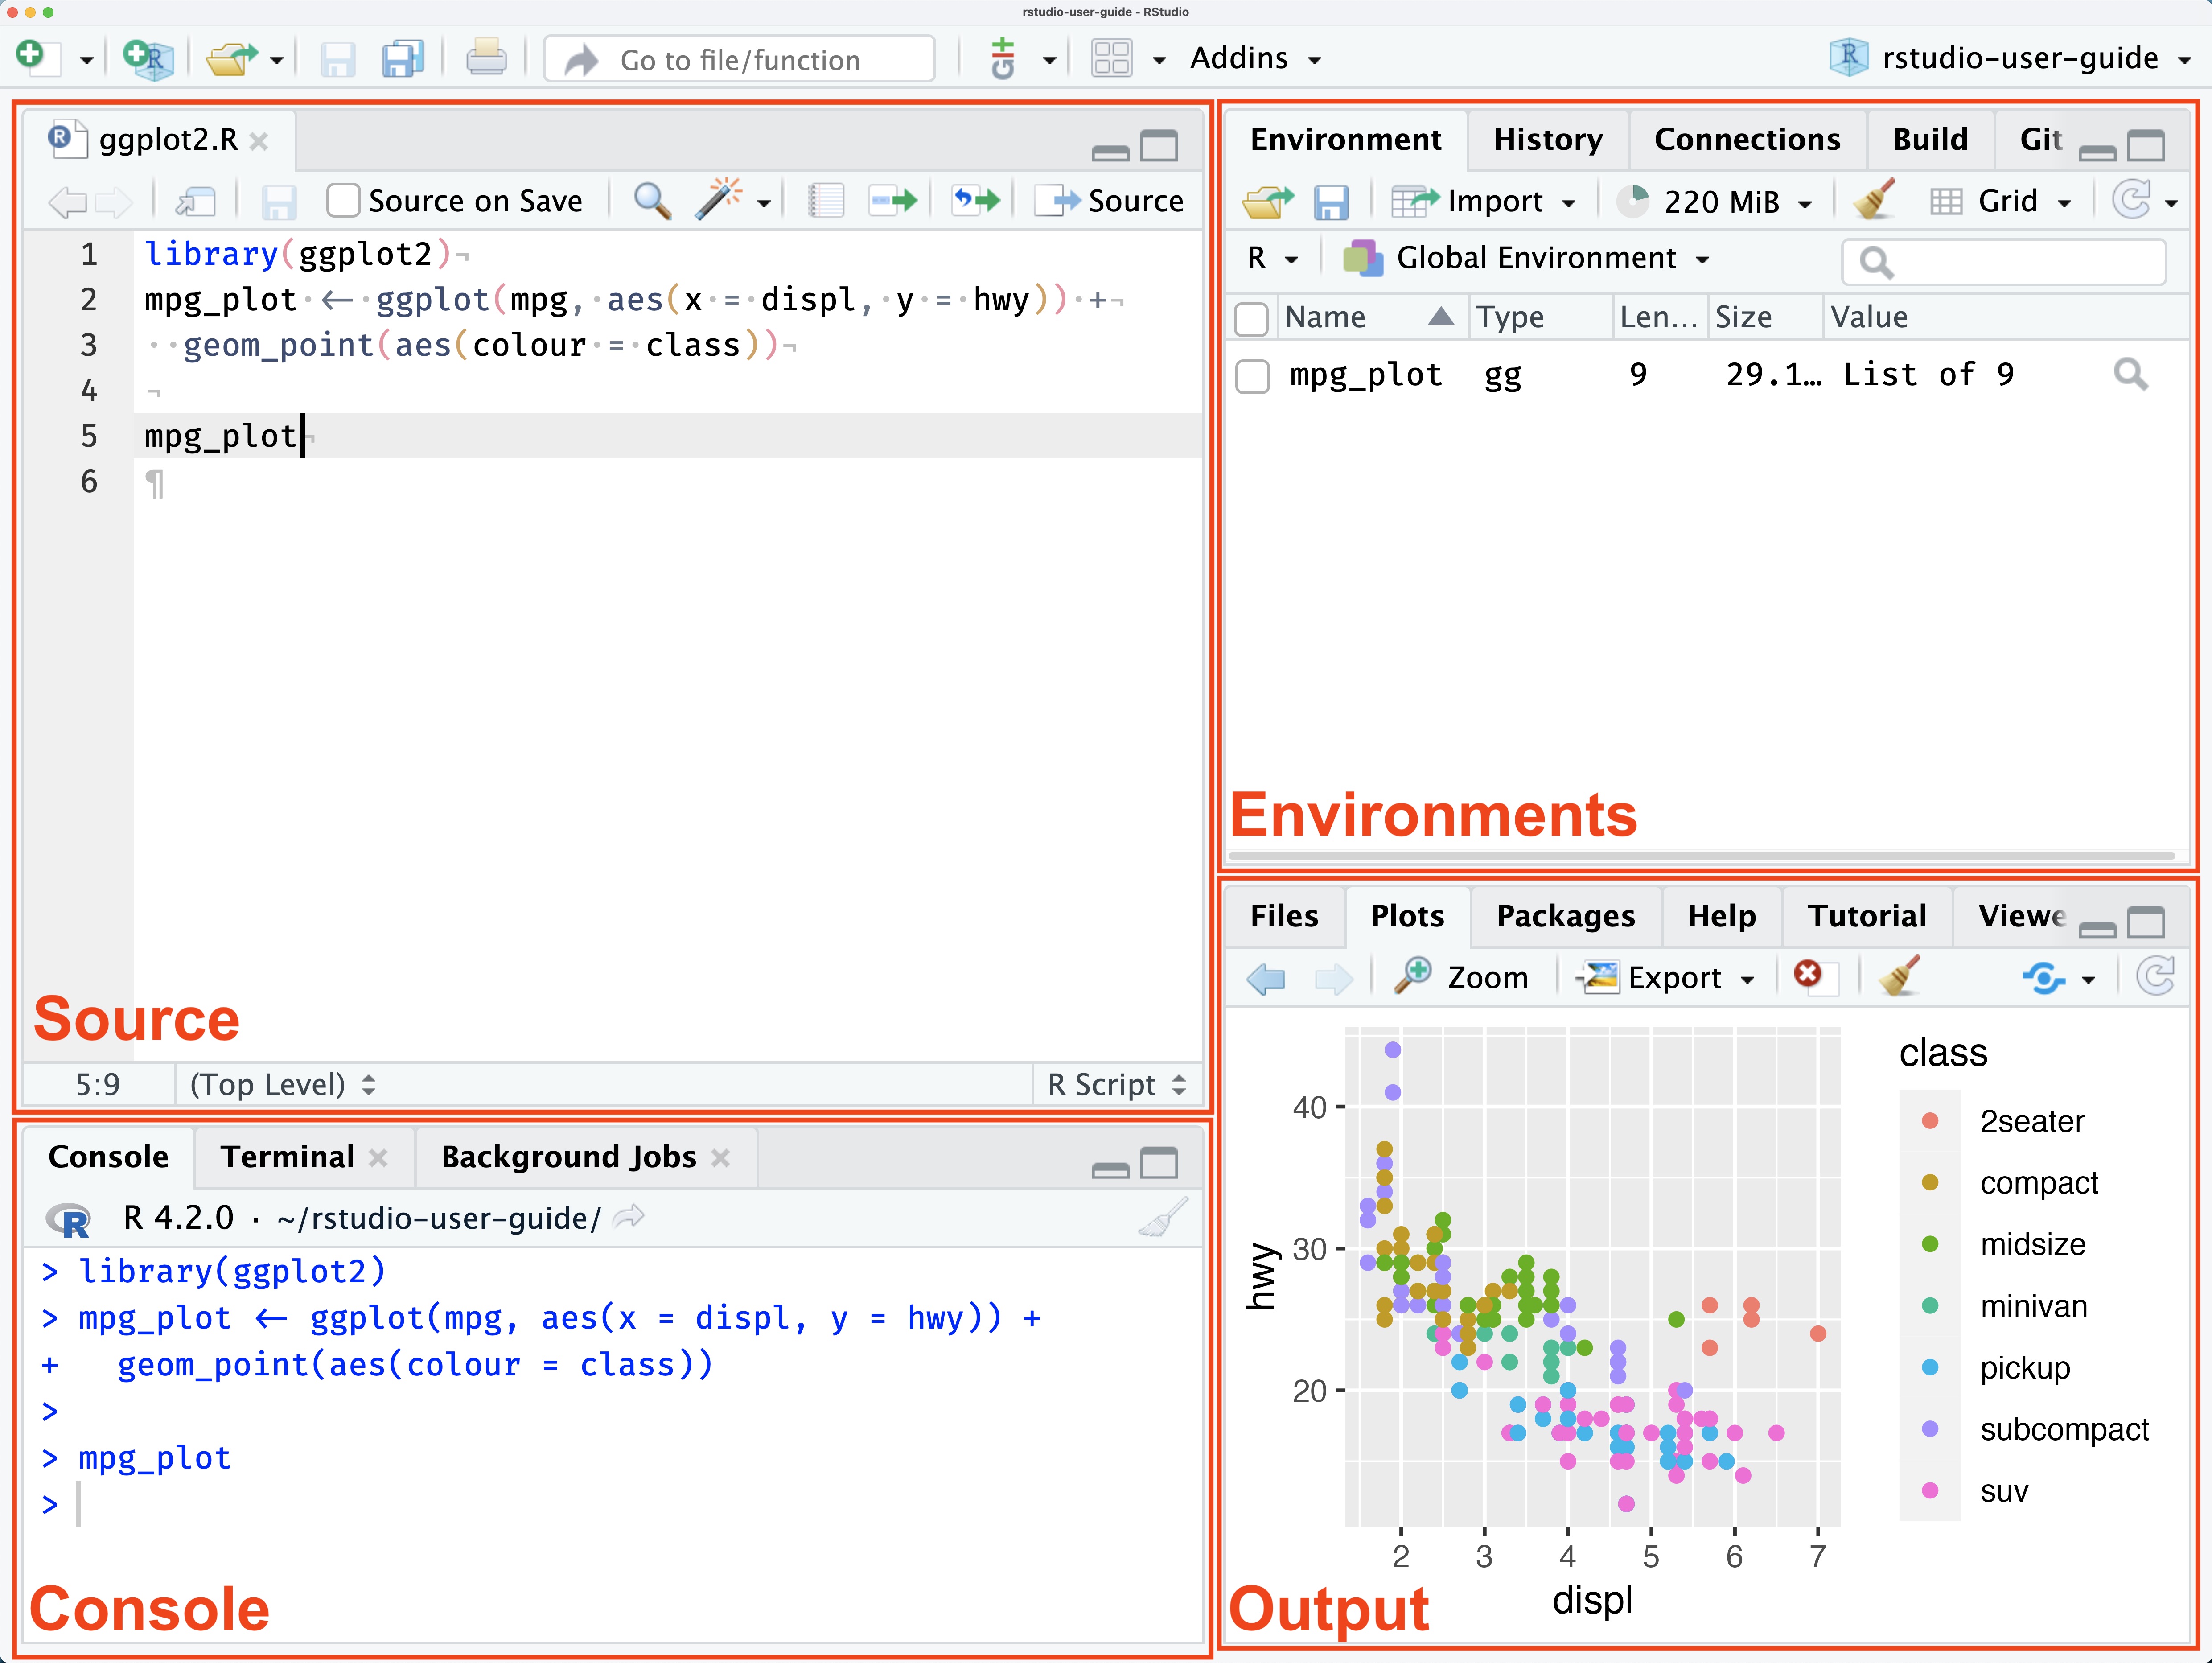
The RStudio environment consists of four panels.
- Source: This is where you can edit R files (either .R or .Rmd) and run R code.
- Console: The console is an interactive R environment, where you can easily run R commands. Commands written in the console are not saved into any file. It can be good to use the console for quickly testing R code
- Environment: This is where R objects made during each session will appear.
- Output: This is where charts and graphs will appear.
6.4 Creating and Saving Files
In this class, we will primarily be working with .Rmd files. An R Markdown or .Rmd is a document format that is designed to easily integrate text and code. This means that you can easily type answers to questions, descriptions of code outputs, and other assignment tasks within the same document as your code.
To make a new .Rmd file, navigate to File > New Script > R Markdown
6.5 Downloading Packages
R packages extend the functionality of Base R and must be downloaded. We will use a small set of libraries in this class.
- tmap: This is the main mapping package we will use
- maptiles: This package helps us add basemaps to our maps
- gt: We will use this package to create nice tables
- tidyverse: This is the package we will use to create “tidy” analysis workflows. Tidyverse also includes ggplot2 which will be our main package to create graphics
- sf: This package allows us to read and manipulate spatial datasets
- terra: This package allows us to read and manipulate rasters
- spdep: We use this package to create neighborhood definitions for spatial data
- sfdep: This package allows integration of spdep to sf
- car: Includes basic statistical functions
- e1071:Includes basic statistical functions
- spatstat:Includes spatial statistical functions
You should copy and paste each of these commands into the Console one by one to download the packages.
Once you have downloaded the packages, you will need to load them every time you want to use them.
6.6 File Management
You will generate a large number of files in this class. The easiest thing to do to make sure that you can succeed in this class is to make sure you are following a file organization structure. These are the rules for file management in this class.
- Everyone MUST make a GEOG215 folder on their computer (please do not put it in your Downloads folder!!!)
- Every time you create a file or download data, you MUST save into your GEOG215 folder
- Do NOT leave files open in RStudio. Every time you stop working, save your file and close it. Then close RStudio.
- If you are not accessing a dataset directly from a cloud location (more on this later), you must use relative file paths to read in the data.
6.7 Accessing Data
For most of this class, you will access datasets directly from Google Drive without downloading them. This makes things simpler and saves you from having to manage a large number of files on your computer. Whenever you need to use data from Google Drive, I will provide the exact command to read it in.
However, there will be cases where you will download data onto your computer. In these cases, you have to tell R where on your computer the data is saved. We do this using a “file path” which references a location on your local computer.
6.7.1 Finding File Paths
Both Mac and PC have ways to find the file path of a particular document.
- On a Mac, press and hold the command key and click on the file > “Get Info” > “Where”
- On a PC, press and hold the shift key and right click on the file > “Copy as Path”
Mac uses forward slashes in file paths (/) by default. Windows sometimes uses backslashes (\) in file paths. You must always use forward slashes in R, even if you are using Windows. This means that if you copy a file path from a PC, you must replace all backslashes to front slashes.
There are two ways to write file paths.
6.7.2 Absolute File Paths
An absolute file path references a specific location on someone’s local computer (what you would get from the “Get Info” or “Copy as Path” and will look something like this:
“/Users/juliacardwell/Documents/GEOG215/my_data.csv”
6.7.3 Relative File Paths
Relative file paths reference a location relative to the current working directory. You can find the current working directory by looking in the console.

For instance, if I had a file within my spatial_data_sciene folder called “my_data.csv”, the relative path would be:
“my_data.csv”
The command “../” takes you “up” one level from the working directory (for instance, if the file was in my Documents folder). The command “/” takes you “down” one level from the working directory (for instance, if I had a sub-folder in my spatial_data_science folder and the data was in there).
When you open a script, the working directory is automatically set to where that script is saved. If you are saving a new file, you must save it, close it, and reopen it for the working directory to be correct.
6.8 .Rmd Formatting
Sometimes we want to modify how code and output actually appears in our knitted document. The follow commands can be used to help format .Rmd documents so that the knitted document is easy to read.
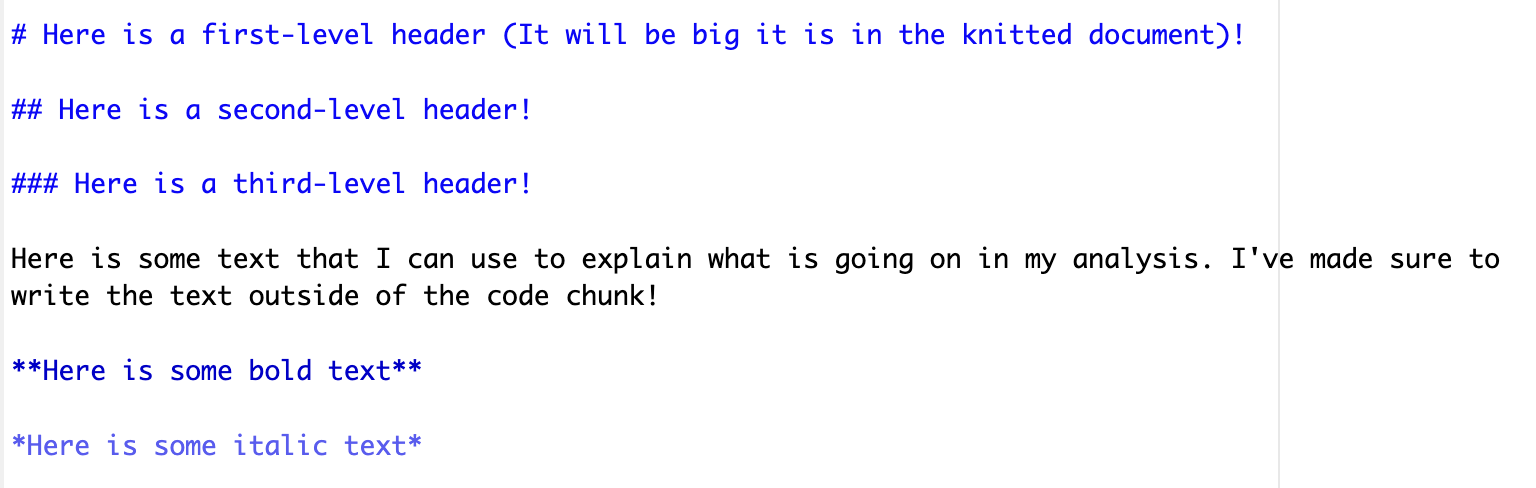
6.8.1 Text Formatting
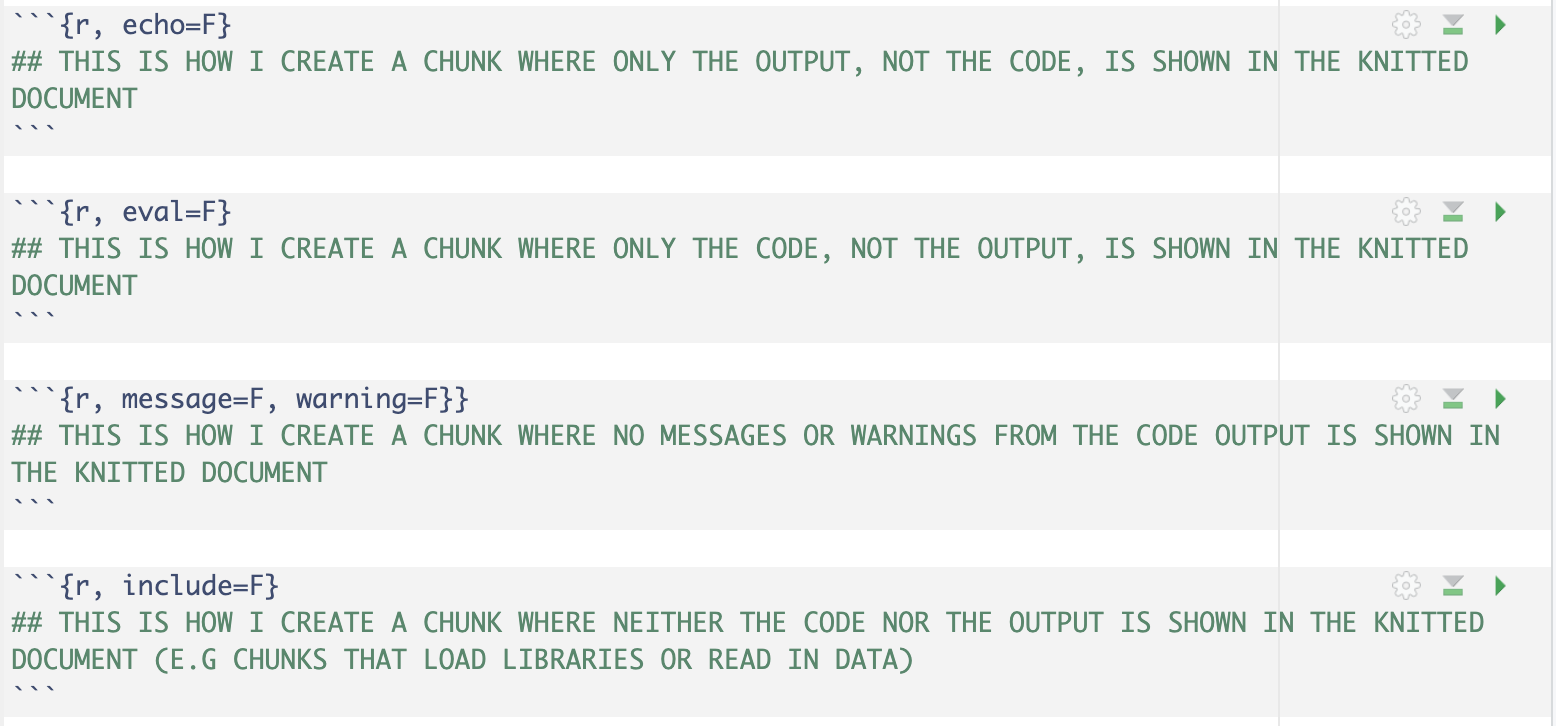
6.8.2 Chunk Formatting